
DIY Yard Games
I'm so excited to share our DIY yard games with you today! We put them out for the Mother's Day Brunch we hosted at our house, and had such a good time. When I was putting together plans for the brunch, I mentioned to James that I thought it would be fun to have some outdoor games for everyone to play and he agreed.
However, I wasn't interested in purchasing the games because they can be so expensive. James is handy and was willing to put his skills to good use so we were in business! :) I knew I wanted to have corn hole and ring toss at least so I went to Pinterest and found several cool ideas.

The corn hole boards we ended up with were made by James from wood we already had from past projects! James can explain what he did better than I could:
After looking around the garage I noticed I had some spare pieces of 3/4" plywood originally purchased for building some drawers I was planning to install under the shelving I built in the garage recently. That idea got nixed after completing the build so I decided to use the wood for corn hole. I had a busy week at work so my main aim in the build was speed. It worked out that the plywood was already cut to 2' x 4' pieces. I also had some scrap 2x4" around that I cut to 4" long pieces (with a 30deg angle) to use as the feet / riser. I cannot say that's to "corn hole regulation" but it looked roughly correct. I just used some cabinet screws to attach the feet to the main board.
For the hole I ended up tracing a bucket my wife had that was about 6" in diameter and then used my router to cut out the hole. The hole isn't perfect because I did not take time to setup a proper guide and just eyed the route line, but for a yard game I don't think perfect is a requirement. Once the hole was cut I decided to stain the plywood because it had a very pretty birch layer on top, and I figured that the wood grains would really come through with a dark stain. All together start to finish (minus drying time) it took me about an hour to make the set. Which was just about right for a busy work week.
As you can see he stained them with some stain I had in the garage and I love the look.

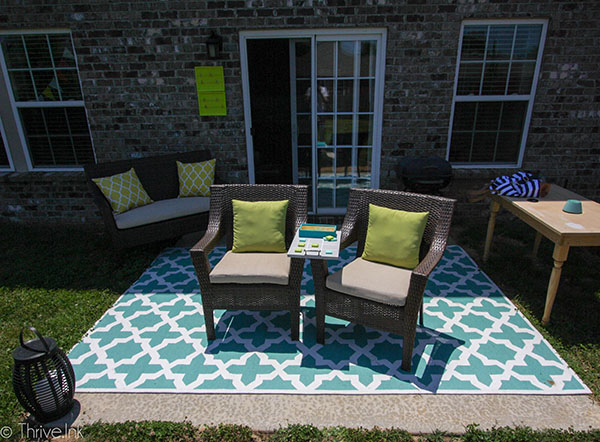
Mother's Day was such a beautiful day and it was perfect for hanging outside. It wasn't too hot and there was a slight breeze.

Our nieces and nephew were so cute running around playing all the games. :) It was so fun seeing them enjoy themselves!
And in keeping-it-real territory, you can see where James' dog had a little too much fun rolling in the grass and now it's having a hard time coming back. :) We put grass seed down and are hoping for the best. :)


I also got the idea to make a portable tic-tac-toe board that the kids could play with. We started with a piece of wood we had in the garage. I thought it was the perfect size (it was just a piece of 3/4" plywood) and I started by painting it with some gray paint I had.
After it dried, I painted white stripes on (using a ruler and painter's tape) and then let that dry.

The next step was the actual pieces for the game. We had a long 2x2 and I asked James to cut it with his saw into some game pieces.
After that I painted them 2 different colors with some craft paint to indicate X's or O's. Then I used a white paint pen and white craft paint to actually put X's and O's on them. :)
James had a great idea to put something on the board that would hold the pieces so they wouldn't get lost. He suggested a box of some sort and we found one at Hobby Lobby for a few bucks. It has a magnetic closure, which is perfect!
Of course I had to paint it ;) so I used some teal craft paint for that. Painting everything was quick and painless with the craft paint I had on hand.
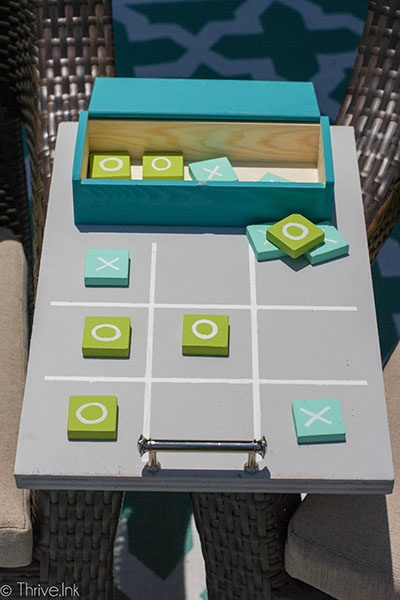
The next step was gluing the box to the board. I used Aleene's quick dry craft glue. Then I asked James to put some handles on the board so it'd be easier to move around. I found these chrome handles at Lowe's. I tried to find them online, but they may just be in the store.

The kids loved playing with the tic-tac-toe board during the brunch, which made me so happy!


For corn hole, I knew we had to have bean bags and I decided to just make some. I picked out some fabric from my stash and tried to make the bags about 4x4". I cut my fabric into 5x5" pieces and used a 1/2" seam allowance on all sides. Then I just sewed them inside out on 3 sides and then flipped it right side out and stitched the last edge after putting beans inside.
I made 6 of them total.


I am not an expert sewer, but I was pretty proud of these!

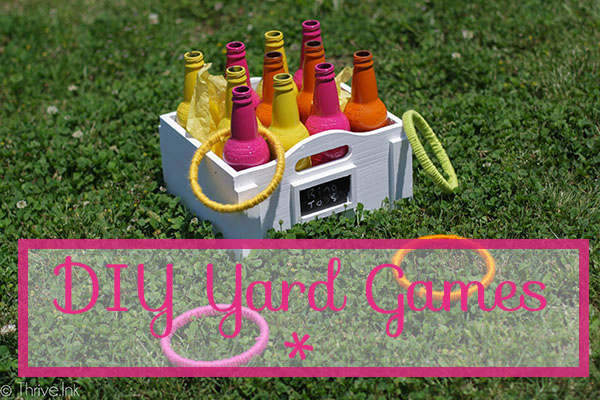
For ring toss, the first thing we did was buy root beer in glass bottles and have family help us drink them. ;)
Then James spray painted all the bottles for me - thanks James! :)
We found this cute crate at Hobby Lobby and it miraculously fit the bottles perfectly! It was unfinished when we bought it and James painted it white for me. I took some chalk and simply wrote ring toss on the cute chalkboard label on the front (which was just part of the crate when we bought it - so fun!).
The rings were made out of small embroidery hoops. I covered them with different colors of yarn and I think they are so sweet.


And me with my bean bags I made. :)

We're so glad we made these! Now whenever we have guests over we just pull out our DIY games and it's nice to have them in the backyard for whoever might want to play them. We are also planning to make our own ladder ball game so check back later for that. :)
Linking up to DIY Showoff Link Party: http://diyshowoff.com/category/other/that-diy-party/